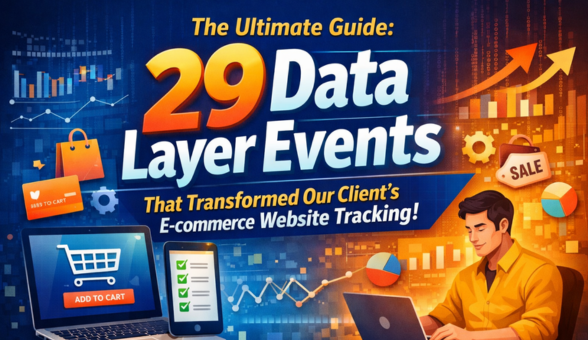
The Ultimate Guide: 29 Data Layer Events That Transformed Our Client’s E-commerce Website Tracking!

We are helping thousands of E-commerce website Owners to manage their online store efficiently —but that’s just the beginning. With the power of the Data Layer, we don’t just set things up and hope for the best. Instead, we track everything in real-time, optimizing the user experience as it happens. It’s like having a backstage pass to your website’s performance. Sounds like a superpower, right? Well, it kinda is!
Curious how the Data Layer can transform your tracking game? Let’s dive in! 🚀
🚀 To kick things off, let’s explore: What is the Data Layer and how does it work its magic?
Imagine you have two friends: one is Website and the other is Tracking Tool. They used to get along just fine, but lately, they’ve had some misunderstandings and stopped talking to each other. Now, they’re completely out of sync and not communicating. That’s where you come in—acting as the middleman.
Your job is to help them talk again, but more importantly, you make sure they’re communicating the right information at the right time. That’s exactly what the Data Layer does.
The data layer is like the bridge between the Website and the Tracking Tool. It stores all the important details about what’s happening on the website (like user actions, clicks, or purchases) and sends that data to the tracking tool, such as Google Tag Manager. It ensures that the website and tracking tool are in sync and that the information being exchanged is accurate and timely. This means that when a user clicks “add to cart” or makes a purchase, the data layer makes sure that the tracking tool gets the exact event it needs to process the action correctly.
So, just like you help your friends get back on track and talk with the right info, the data layer ensures that your website and tracking tool communicate perfectly, making sure all the right events are captured without any misunderstandings!
🚀 The Shopper’s Journey: Tracking User Behavior with Data Layer Events (With Example Code!)
Meet Priya—a fashion-savvy online shopper hunting for the perfect trendy handbag for an upcoming event. As she browses an e-commerce site, every step of her journey is seamlessly tracked using Google Tag Manager’s Data Layer Events. This not only helps the website enhance her shopping experience but also provides valuable insights to optimize conversions.
🛤️ User Session & Navigation Tracking
As Priya begins her journey on the website, her session starts, marking the beginning of her exploration.
🔹 Session Begins – The website welcomes Priya as she starts browsing.
🔹 Homepage Arrival – She lands on the main page, ready to explore.
🔹 Clicking a Referral Link – A friend’s recommendation brings her here.
🔹 Exploring Promotions – She clicks on banners that spark her interest.
🔹 Engaging via WhatsApp – A quick chat before making a decision.
🔹 Contact Form Submission – Reaching out with inquiries before proceeding.
1. Tracking “Session Start” Events with Data Layer
Now, Priya just landed on your website, excited to browse the latest handbag collections, check out reviews, and maybe even make a purchase. The moment she arrives, her session begins—and tracking this Session Start event is key to understanding her journey from the get-go.
By capturing this event, you can analyze user engagement, measure session duration, and optimize the overall shopping experience. After all, the first interaction sets the tone for the rest of the journey!
Example:
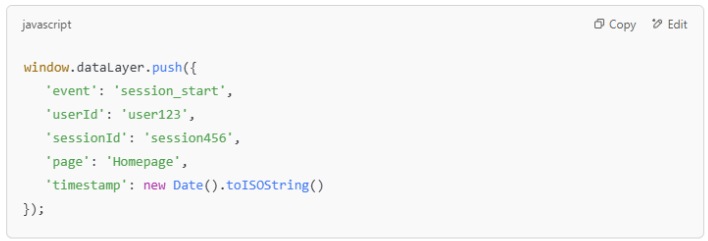
🔍 What Happens Here?
>>> Priya starts a new session → The Data Layer triggers the ‘session start’ event.
>>> It logs essential session details, such as user ID, session ID, page visited, and timestamp.
>>> Tracking tools capture this session activity, giving you insights into her initial interaction and the overall session quality.
Tracking the start of each session is crucial for understanding how users engage with your site from the very first click. With this data, you can track user paths, optimize landing pages, and uncover opportunities to boost engagement right from the start.
Want to maximize user retention and keep users engaged from the get-go? 🚀
2. Tracking a Homepage Visit with Data Layer
Priya, on the hunt for the perfect “trendy handbags,” hits Google and lands right on your homepage. To track this visit, the Data Layer captures the event, giving you valuable insights into how users like Priya are finding your site.
Example:
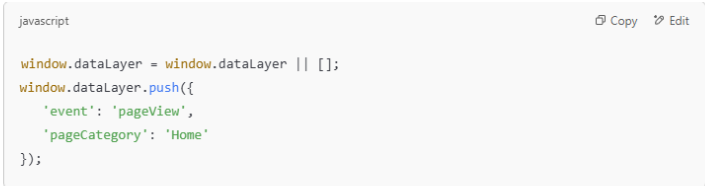
🔍 What Happens?
>>> Priya visits the homepage → The Data Layer triggers a ‘pageView’ event.
>>> It stores the pageCategory as ‘Home’ and sends this data to Google Tag Manager.
>>> Tracking tools log the visit, providing valuable insights into how users like Priya are interacting with your homepage.
By tracking these visits, you can get a clear picture of user behavior and fine-tune your website to enhance engagement and conversions.
3. Tracking “Referral Click” Events with Data Layer
Here, Priya clicks a referral link from an influencer and lands on a product page, ready to explore what you have to offer. But how can you track that she came through that referral link? That’s where the Referral Click event kicks in!
Example:
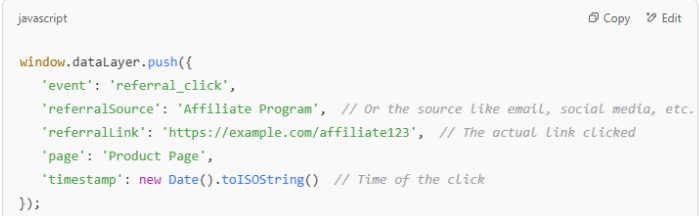
🔍What Happens Here?
>>> Priya clicks a referral link → This triggers the ‘referral_click’ event in the Data Layer.
>>> Logs valuable referral data like the source (affiliate program, social media, etc.), the link clicked, and the page she lands on.
>>> Helps track the source of traffic, so you know which referral campaigns are bringing in the most visitors.
Tracking Referral Clicks lets you measure the effectiveness of your affiliate marketing, influencer partnerships, or referral programs. It gives you valuable insights into where your new users are coming from, helping you fine-tune your marketing efforts and reward those driving traffic your way.
By knowing the traffic sources, you can better target your audience in future campaigns and focus on the channels that bring the most value to your business. Ready to boost your marketing strategy? 🚀
4. Tracking “Click on Promotional Banner” Events with Data Layer
While browsing the homepage, Priya spots an exciting promotional banner offering a limited-time discount. Intrigued, she clicks on the banner to explore the offer. The Data Layer captures this action, allowing you to track how users are interacting with promotional banners. This provides valuable insights into the effectiveness of your marketing efforts and how engaging your offers are.
Example:

🔍 What Happens Here?
>>> Priya clicks on the banner → The Data Layer triggers a ‘click_promo_banner’ event.
>>> It logs banner details like ID, type, and location on the page.
>>> Tracking tools capture the click event, allowing you to measure the performance of your promotional banners.
Tracking clicks on promotional banners helps you understand how well your promotions are resonating with users. By knowing which banners users are engaging with most, you can refine your marketing strategy, adjust the placement or content of your banners, and improve overall user engagement.
5. Tracking “WhatsApp Chat Click” Events with Data Layer
Suddenly, Priya spots a WhatsApp chat button on the corner of the page. Curious about product availability, she clicks the WhatsApp icon to start a chat. This interaction is captured by the Data Layer, allowing you to track user engagement with the chat feature and measure how often users reach out for assistance via WhatsApp.
Example:
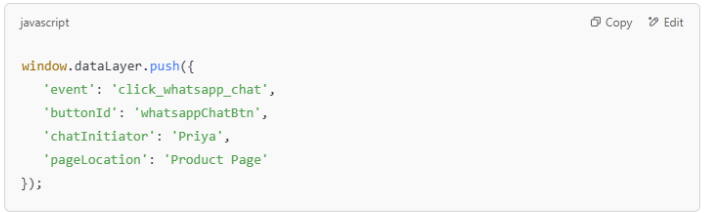
🔍 What Happens Here?
>>> Priya clicks on the WhatsApp chat button → The Data Layer triggers a ‘click_whatsapp_chat’ event.
>>> It logs button details like ID, chat initiator, and page location.
>>> Tracking tools capture the click event, providing insights into how often users engage with your chat feature.
Tracking WhatsApp chat clicks is crucial for understanding how your customers prefer to interact with you. It helps you optimize your customer support experience, identify the most effective pages for engagement, and refine your conversion strategies to drive more interactions.
Ready to improve customer engagement and optimize your WhatsApp chat feature? 🚀
6. Tracking “Contact Form Submission” Events with Data Layer
After finding the product she loves, Priya decides to reach out to customer support via the contact form on the website to inquire about delivery options. When she submits the form, the Data Layer captures this action, allowing you to track when users fill out and submit forms on your site.
This is a valuable event for understanding how customers are seeking support and getting in touch with you.
Example:
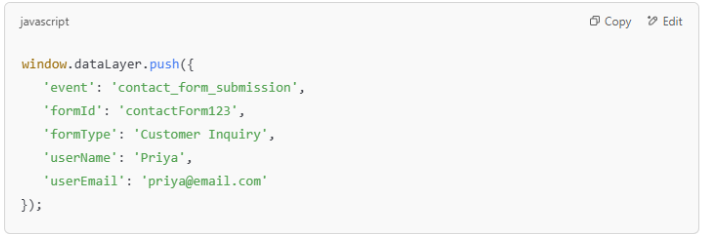
🔍 What Happens Here?
>>> Priya submits the contact form → The Data Layer triggers a ‘contact_form_submission’ event.
>>> It logs form details like ID, type, and user details.
>>> Tracking tools capture the submission activity, providing insights into user engagement and support requests.
Tracking contact form submissions allows you to understand how users interact with your support channels. It helps you analyze customer inquiries, optimize your forms, and improve both lead generation and customer satisfaction.
🛍️ User Interaction & Browsing
Curious about the latest trends, Priya browses through different categories, applies filters to refine her choices, and clicks on products that catch her eye. Every interaction she makes, from scrolling through collections to viewing product details, shapes her shopping experience.
🌟 Category Browsing – She scrolls through different collections.
🌟 Applying Filters – Narrowing choices to find the perfect product.
🌟 Clicking on a Product – A particular item captures her attention.
🌟 Viewing Product Details – Examining images, descriptions, and reviews.
Improve Your Tracking Setup!
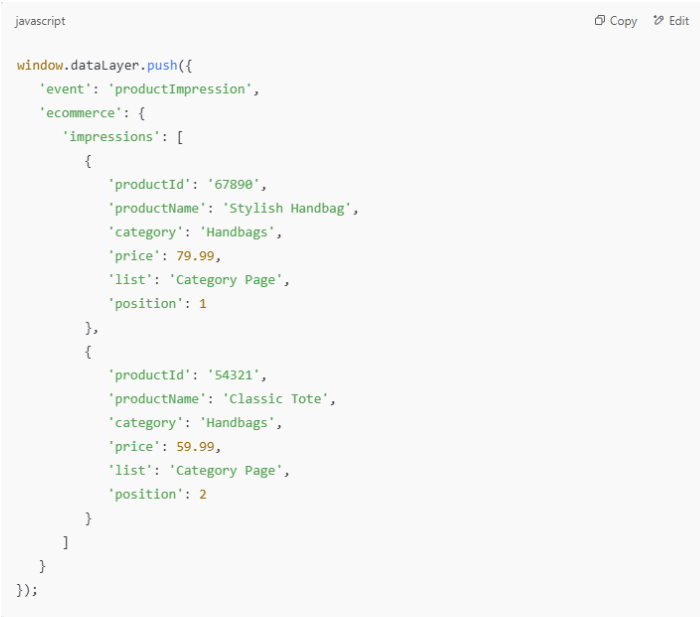
7. Tracking Product Views on Category & Collection Pages with Data Layer
Priya’s journey continues—she’s now browsing your handbag collection page, on the hunt for the perfect bag. As she scrolls through, every product that catches her eye gets tracked by the Data Layer. This helps you capture which products are grabbing her attention.
Example:
🔍 What Happens Here?
>>> Priya views handbags on the collection page → The Data Layer triggers a ‘productImpression’ event.
>>> It logs key product details like ID, name, category, price, and position on the page.
>>> Tracking tools analyze which products get the most views, helping you optimize product placements and make smarter recommendations.
By tracking product impressions, you gain valuable insights into what captures user interest, allowing you to improve product positioning and boost conversions! 🚀
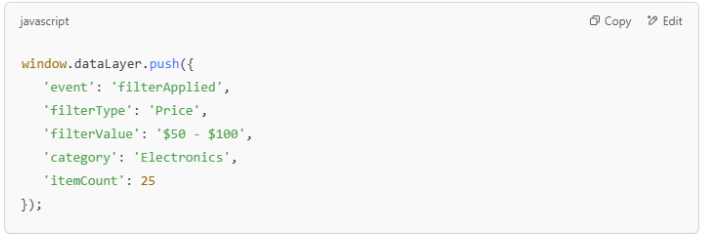
8. Tracking Filter_Applied with Data Layer
As Priya continues shopping, she decides to narrow down her options by applying filters. Whether it’s sorting by price, color, brand, or rating, capturing this action is key to understanding how users like Priya interact with your product catalog.
Tracking filter applications is an essential part of the user journey. It reveals what criteria users are using to find the products they want, providing insights that are crucial for optimizing your offerings, enhancing the user experience, and analyzing search behavior.
Example:
🔍 What Happens Here?
>>> Filter Applied: When Priya selects a filter, like price range or product type, this event is pushed to the Data Layer.
>>> Event Details:
- Filter Type: The category of the filter applied (e.g., ‘Price’, ‘Brand’, ‘Rating’).
- Filter Value: The specific value chosen by Priya (e.g., ‘$50 – $100’, ‘Red’, ‘4 Stars and Above’).
- Category: The product category being filtered (e.g., ‘Handbags’).
- Item Count: The number of items that match the filter criteria (e.g., ’25’).
By capturing these details, you can better understand how Priya and other users are refining their search, helping you optimize product offerings and improve search functionality!
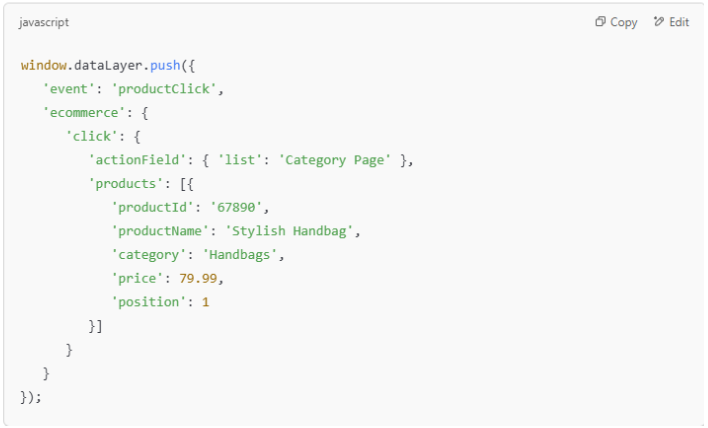
9. Tracking Product Clicks on Category & Product Pages with Data Layer
Priya is still browsing your handbag collection page when she spots a stylish handbag that catches her eye. She clicks on the image to get more details, and that’s where the Data Layer comes in. It captures this action, helping you track which products are attracting the most clicks.
Example:
🔍 What Happens Here?
>>> Priya clicks on a product image → The Data Layer triggers a ‘productClick’ event.
>>> It logs key product details, including ID, name, category, price, and position on the page.
>>> Tracking tools then analyze which products get the most engagement, helping you optimize placements.
By capturing these clicks, you can improve product discoverability and refine category page layouts—ultimately boosting conversions! 🚀
10. Tracking Product Detail Page Views with Data Layer
Priya, after clicking on the Stylish Handbag from the category page, is now on its product detail page. At this moment, the Data Layer captures her interaction, allowing you to track how many users engage with individual product pages.
Example:

🔍 What Happens Here?
>>> Priya lands on the product detail page → The Data Layer triggers a ‘productDetailView’ event.
>>> It logs key product details like ID, name, category, and price.
>>> Tracking tools then analyze how many users view specific products, helping you optimize product descriptions, images, and pricing.
By tracking these product detail page views, you can spot high-interest products, fine-tune your SEO strategies, and boost user engagement! 🚀
💖 Wishlist & Cart Actions
Some items instantly steal Priya’s heart, so she adds them to her wishlist for later. Others make it straight to her cart, but indecisiveness kicks in—should she remove an item? Maybe replace it with something else? Every choice she makes is tracked, capturing her shopping habits.
💡 Adding to Wishlist – A must-have, but for another day.
💡 Removing from Wishlist – Changed her mind? No problem.
💡 Adding to Cart – Excitement builds as she moves closer to checkout.
💡 Removing from Cart – Reconsidering her choices, she removes an item.
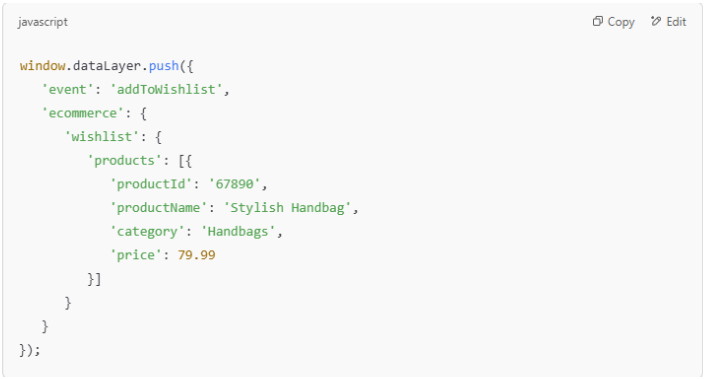
11. Tracking “Add to Wishlist” Events with Data Layer
Priya spots the Stylish Handbag again, but she’s not quite ready to make a purchase. So, she clicks the “Add to Wishlist” button to save it for later. This action is captured by the Data Layer, helping you track how often users add products to their Wishlist.
Example:
🔍 What Happens Here?
>>> Priya clicks “Add to Wishlist” → The Data Layer triggers an ‘addToWishlist’ event.
>>> It logs key product details like ID, name, category, and price.
>>> Tracking tools analyze how often users add products to their wishlists, providing insights that can help refine marketing campaigns and product recommendations.
By tracking add-to-wishlist actions, you can identify popular products, enhance personalized marketing, and ultimately increase conversion rates when users decide to make a purchase! 🚀
12. Tracking “Remove from Wishlist” Events with Data Layer
Priya decides to remove the Stylish Handbag from her Wishlist. Maybe it didn’t meet her expectations, or she just isn’t interested anymore. When she clicks the “Remove from Wishlist” button, the Data Layer captures this action, giving you insights into how often users remove items from their Wishlist.
Example:
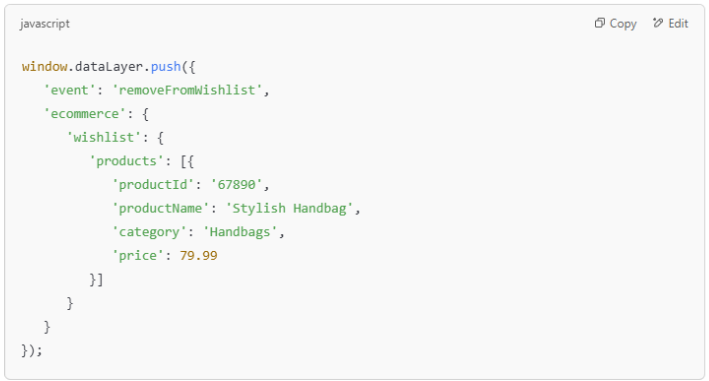
🔍 What Happens Here?
>>> Priya clicks “Remove from Wishlist” → The Data Layer triggers a ‘removeFromWishlist’ event.
>>> It logs important product details like ID, name, category, and price.
>>> Tracking tools analyze how often users remove items from their wishlists, giving you valuable insights into user preferences and product appeal.
By tracking remove-from-wishlist actions, you can better understand why users lose interest in certain products, refine your product offerings, and optimize your marketing strategies to boost engagement! 🚀
13. Tracking “Add to Cart” Clicks with Data Layer
After getting a closer look at the Stylish Handbag, Priya decides it’s the perfect choice for her. She clicks the “Add to Cart” button, and that’s when the Data Layer steps in to capture this key action.
Example:
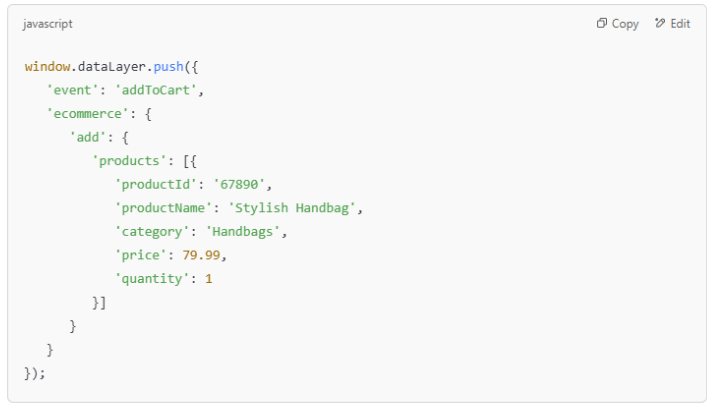
🔍 What Happens Here?
>>> Priya clicks “Add to Cart” → The Data Layer triggers an ‘add To Cart’ event.
>>> It logs key product details like ID, name, category, price, and quantity.
>>> Tracking tools analyze which products users add to their carts, helping you optimize pricing, offers, and recommendations.
By tracking these add-to-cart actions, you can reduce cart abandonment, identify popular products, and improve your conversion rates! 🚀
14. Tracking “Remove from Cart” Clicks with Data Layer
Priya added the Stylish Handbag to her cart, but after thinking it over, she decides to remove it. When she clicks the “Remove from Cart” button, the Data Layer captures this action, giving you insight into how often users remove products from their carts.
Example:

🔍 What Happens Here?
>>> Priya clicks “Remove from Cart” → The Data Layer triggers a ‘removeFromCart’ event.
>>> It logs important product details like ID, name, category, price, and quantity.
>>> Tracking tools analyze cart removals, helping you identify trends in user hesitation or concerns about pricing.
By tracking remove-from-cart actions, you can pinpoint potential pain points, optimize pricing strategies, and reduce cart abandonment rates! 🚀
🔑 User Authentication & Profile Management
Priya decides to create an account to unlock a more personalized experience. She registers, logs in, and even updates her profile with preferences. She tweaks her notification settings to stay updated but not overwhelmed—tailoring the experience just for her.
🛡️ Registering an Account – A new journey begins with a sign-up.
🛡️ Logging In – Priya returns to pick up where she left off.
🛡️ Updating Profile – A fresh touch to personalize her account.
🛡️ Notification Preferences – Setting alerts for updates without spam.
Improve Your Tracking Setup!
15. Tracking “Register” or “Sign In” Events with Data Layer
When Priya decides to sign up for an account on the site to access exclusive deals, the Data Layer captures this action. Whether she’s registering for the first time or signing in as an existing user, tracking this event gives you insights into how often new users create accounts and how frequently existing users log in.
Example:
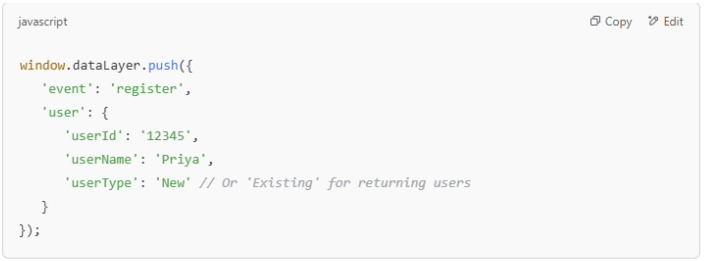
🔍 What Happens Here?
>>> Priya registers/signs in → The Data Layer triggers a ‘register’ or ‘sign In’ event.
>>> It logs important user details like ID, name, and user type.
>>> Tracking tools analyze registration and sign-in activity, helping you understand user acquisition and engagement trends.
Tracking register/sign-in events lets you analyze user sign-ups and login behaviors, giving you key insights into your user base growth. It also helps identify ways to refine the onboarding process! 🚀
16. Tracking “Login” Events with Data Layer
Before making her purchase, Priya decides to log into her account. She clicks the “Login” button, and the Data Layer captures this action. This helps track how often users log into their accounts on your site, giving you insights into user engagement and activity.
Example:
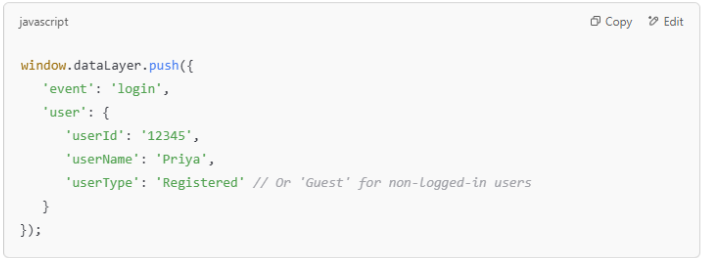
🔍 What Happens Here?
>>> Priya logs in → The Data Layer triggers a ‘login’ event.
>>> It logs key user details such as ID, name, and user type.
>>> Tracking tools analyze user logins, offering valuable insights into user engagement and identifying returning customers.
By tracking login actions, you can optimize the user experience, personalize content, and encourage repeat visits to drive conversions! 🚀
17. Tracking “Profile Update” Events with Data Layer
After logging in, Priya decides to update her profile—adding a new shipping address and updating her contact information. This important action is captured by the Data Layer, so you can track profile updates and gain insights into how users interact with their accounts, going beyond just browsing or purchasing.
Example:
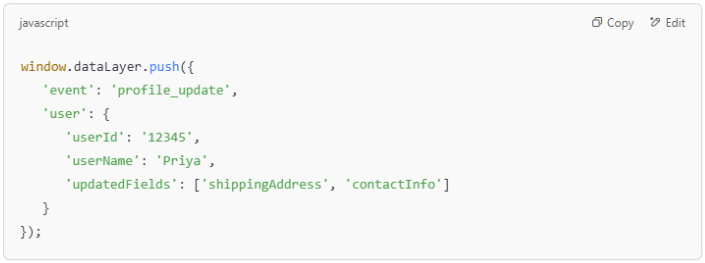
🔍 What Happens Here?
>>> Priya updates her profile → The Data Layer triggers a ‘profile update’ event.
>>> It logs the updated fields, such as shipping address and contact info.
>>> Tracking tools capture the update activity, providing insights into user profile interactions and account management behaviors.
Tracking profile update events gives you valuable insights into how users engage with their personal accounts. This data can help improve your user experience and personalization strategies. By understanding which fields are updated most frequently, you can optimize profile pages and enhance the overall user journey.
Ready to optimize your user profile interactions and take your site to the next level? 🚀
18. Tracking “Notification Preferences Update” Events with Data Layer
Priya wants to fine-tune her communication preferences on your site. She opts in to receive updates on special discounts and new arrivals, but decides to skip the promotional emails. By capturing this action, you get a clear view of how users like Priya are managing their notification settings.
This data helps you send only the most relevant notifications, enhancing the user experience and keeping your audience engaged with content that matters to them. Ready to personalize your notifications and create a more tailored experience for your users? 🚀
Example:
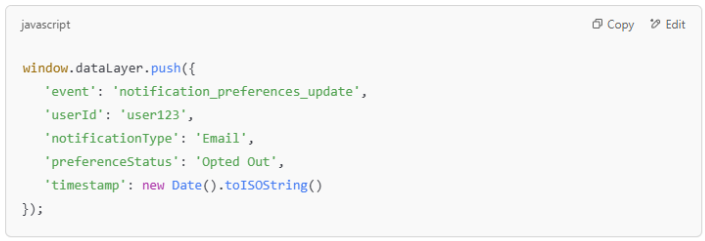
🔍What Happens Here?
>>> Priya updates her notification preferences → Data Layer triggers ‘notification_preferences_update’ event
>>> Logs preferences (user ID, notification type, and status)
>>> Tracking tools capture the update, giving you insights into what notifications Priya (and other users) want to receive
By tracking these preferences, you can tailor your communication strategy. This ensures users get only the updates that matter to them, creating a more personalized experience. The result? Increased engagement and fewer unsubscribes from notifications. 🚀
💳 Checkout & Transactions
With her favorite picks in the cart, Priya moves toward checkout. She applies a discount coupon, removes one she no longer needs, and finally completes her purchase. As she receives the order confirmation, excitement builds—her shopping adventure is complete!
🛍️ Entering Checkout – She’s ready to place her order.
🛍️ Applying a Coupon – Who doesn’t love a discount?
🛍️ Removing a Coupon – Maybe another deal is better.
🛍️ Completing the Purchase – The final click that seals the deal!
19. Tracking Checkout Steps with Data Layer
So, Priya is finally ready to make her purchase! She added her items to the cart and clicked on the checkout button. But here’s the big question: how do you track each step she takes through the checkout process? That’s where the checkout steps event in the data layer comes in.
By tracking every action she takes — like entering payment details, applying a coupon, or confirming the purchase — you can spot where users might be dropping off or getting stuck. This insight helps you optimize the entire checkout experience, improve conversions, and ultimately reduce cart abandonment.
Example:
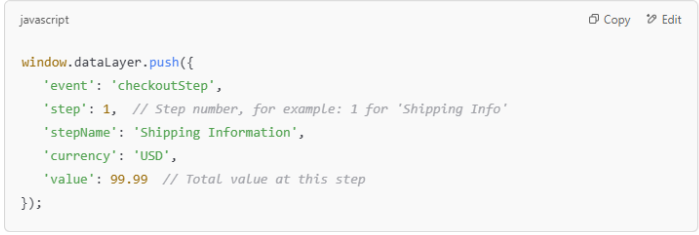
🔍What Happens Here?
>>> Tracking the checkout journey: Every time Priya moves forward in the checkout process — like entering shipping info or choosing her payment method — the Data Layer captures it.
>>> Event details include: Step number, step name (like “Shipping Information” or “Payment Details”), the currency being used, and the total value of her cart at that point.
By tracking each step of the checkout, you’re getting key data that helps smooth out the process. This helps optimize the entire checkout experience, minimizing friction, and increasing the likelihood of successful transactions. It’s crucial for improving e-commerce performance!
20. Tracking “Apply Coupon” Events with Data Layer
As Priya moves to checkout, she enters a coupon code to claim a discount on her Stylish Handbag purchase. This action is captured by the Data Layer, tracking when users apply coupon codes during the checkout process. Monitoring coupon usage helps you understand customer behavior and optimize your promotional efforts.
Example:
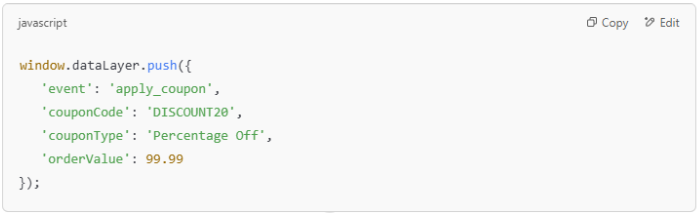
🔍What Happens Here?
>>> Priya applies a coupon → Data Layer triggers ‘applyCoupon’ event
>>> Logs coupon details (code, discount amount, cart totals before and after)
>>> Tracking tools capture the coupon usage, giving insights into customer savings, promo engagement, and overall effectiveness
Tracking “Apply Coupon” actions provides valuable insights into how customers respond to your promotions. It helps you assess the success of your discounts, refine your promotional strategies, and drive more conversions by offering the right incentives at the right time.
21. Tracking “Remove Coupon” Events with Data Layer
After applying a coupon to her order, Priya decides to remove it, either because she found a better offer or changed her mind. This action is captured by the Data Layer, allowing you to track when users remove a coupon from their cart during checkout. Monitoring coupon removals provides important insights into customer behavior and helps you refine your promotional strategies.
Example:

🔍What Happens Here?
>>> Priya removes the coupon code → Data Layer triggers ‘remove_coupon’ event
>>> Logs coupon details (code, type, and order value)
>>> Tracking tools capture the coupon removal, providing insights into why users opt out of the discount and how often this happens
Tracking coupon removals is key to understanding customer preferences and optimizing future promotions. If customers often remove specific coupons, it may indicate that the offer needs to be adjusted or made more attractive to increase conversion rates.
Ready to refine your promotional offers and boost customer engagement? 🚀
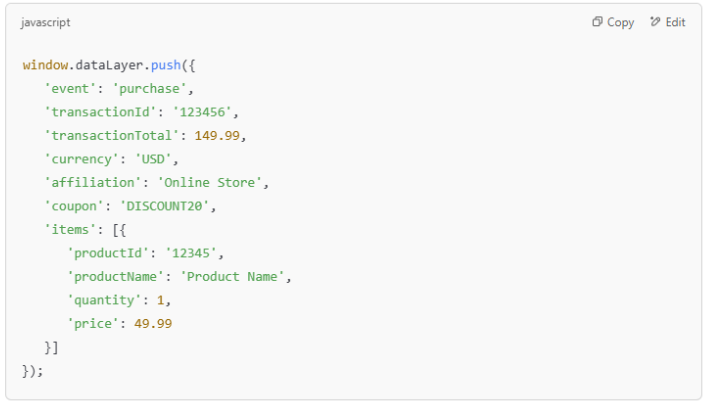
22. Tracking Purchase Data Layer
So, Priya’s done with the checkout and made her purchase—this is the moment we’ve all been waiting for! The purchase event gets triggered in the data layer, giving you the key data you need to track conversions, measure revenue, and get a real sense of how well your e-commerce funnel is performing.
Example:
🔍What Happens Here?
>>> Tracking the purchase: When Priya confirms her order, the purchase event is fired.
>>> Event details:
- Transaction ID: A unique identifier for the purchase (e.g., ‘123456’).
- Transaction total: The total amount spent on the transaction (e.g., ‘149.99’).
- Currency: The currency used for the transaction (e.g., ‘USD’).
- Affiliation: The source or store (e.g., ‘Online Store’).
- Coupon: Any discount code used (e.g., ‘DISCOUNT20’).
- Items: Details of the products purchased (e.g., product ID, name, quantity, and price).
Tracking the purchase event is essential for:
- Measuring sales performance: You can assess the total revenue generated and evaluate the effectiveness of your sales efforts.
- Campaign analysis: By tracking purchases, you can tie them back to marketing campaigns or referral sources and measure their effectiveness.
- Conversion rate optimization: By capturing the entire purchase event, you can pinpoint successful conversions and areas where users might have dropped off before completing the purchase.
With the purchase data layer event, you have an essential piece of the puzzle in optimizing your sales and marketing strategy, ensuring your e-commerce site is performing at its best!
23. Tracking “Notify Me When In Stock” Events with Data Layer
Priya has been eyeing a product on your site, but unfortunately, it’s out of stock. Instead of leaving, she decides to sign up for the “Notify Me When In Stock” feature so she can be alerted when the product becomes available again. This action is captured by the Data Layer, helping you track when users express interest in products that are currently unavailable.
By tracking these events, you gain valuable insights into demand for out-of-stock products, helping you adjust inventory strategies and identify which products are in high demand.
Example:

🔍 What Happens Here?
>>> Priya subscribes for notifications → Data Layer triggers ‘notify_me_in_stock’ event
>>> Logs product details (ID, name, user email, and notification type)
>>> Tracking tools capture the sign-up activity, providing insights into customer interest and demand for out-of-stock items
Tracking “Notify Me When In Stock” events helps you measure demand for specific products and optimize your inventory strategy. By understanding which products customers are eagerly waiting for, you can make better decisions on restocking, promotions, and overall sales strategy.
📦 Post-Purchase & Order Management
Not everything goes as planned—Priya might cancel an order or even request a refund. Whether she’s thrilled with her purchase or needs adjustments, her post-purchase journey is just as important as the buying decision.
📦 Canceling an Order – A last-minute change of heart.
📦 Requesting a Refund – Something didn’t work out as expected.
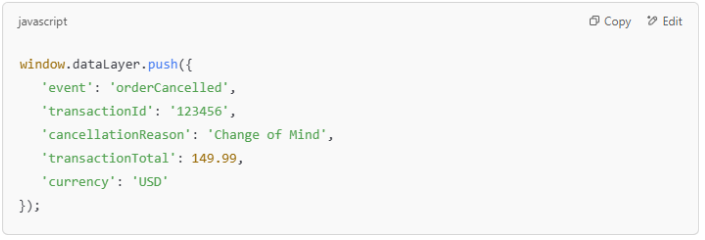
24. Tracking Order_Cancelled Data Layer
So, Priya decides to cancel her order. It happens—maybe she had a change of heart, encountered a payment issue, or the product was out of stock. Whatever the reason, capturing this cancellation event in the data layer is crucial. It helps you understand why sales are lost and gives you the insights you need to improve the overall customer experience.
By tracking order cancellations, you can spot trends, monitor how often they happen, and make data-driven adjustments to your strategies. Knowing why cancellations occur allows you to fine-tune your processes and turn potential lost sales into future opportunities.
Example:
🔍 What Happens Here?
>>> Order Cancelled: When Priya cancels her order, the event is fired.
>>> Event details:
- Transaction ID: A unique identifier for the cancelled order (e.g., ‘123456’).
- Cancellation Reason: The reason why the order was cancelled (e.g., ‘Change of Mind’, ‘Payment Issue’, ‘Product Out of Stock’).
- Transaction Total: The total amount of the cancelled transaction (e.g., ‘149.99’).
- Currency: The currency used for the cancelled transaction (e.g., ‘USD’).
Tracking the order cancelled event is important for:
- Identifying trends: By capturing the cancellation reasons, you can detect patterns and see if there are specific issues causing customers to cancel their orders (e.g., payment issues, shipping concerns).
- Improving conversion rates: Understanding why users abandon their carts or cancel orders helps you take actions to prevent cancellations in the future, such as improving payment gateways or providing better product availability.
- Enhancing customer service: With cancellation data, you can reach out to customers to offer assistance or try to recover the sale, improving overall customer satisfaction.
By tracking order cancellations, you’re gathering valuable insights that can help refine your e-commerce site, reduce lost sales, and improve customer retention strategies.
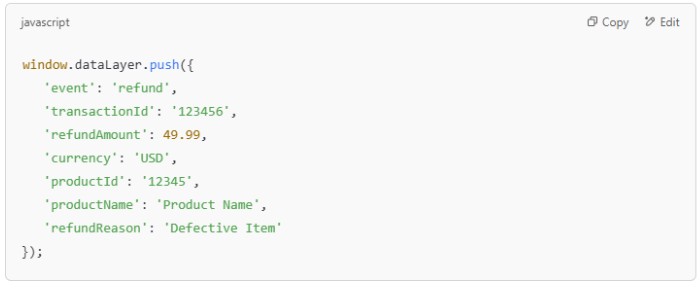
25. Tracking Refund Data Layer
Refunds can happen for all sorts of reasons—maybe Priya wasn’t happy with the product, there was an order mix-up, or even a delivery issue. Whatever the cause, tracking refund events is essential. It gives you valuable insights into product returns, helps you manage your financials, and ultimately boosts customer satisfaction.
When Priya requests a refund, capturing this event through the Data Layer is key. It allows you to identify patterns in refunds and pinpoint any recurring issues. With this data, you can fine-tune your e-commerce strategy and set better expectations with your customers, ensuring they have a smoother experience.
Example:
🔍 What Happens Here?
>>> Refund Event: When Priya requests a refund for a product, this event is pushed to the Data Layer.
>>> Event details:
- Transaction ID: A unique identifier for the refunded order (e.g., ‘123456’).
- Refund Amount: The total refund amount for the order (e.g., ‘49.99’).
- Currency: The currency used for the refund (e.g., ‘USD’).
- Product ID: The unique identifier for the refunded product (e.g., ‘12345’).
- Product Name: The name of the product that is being refunded (e.g., ‘Product Name’).
- Refund Reason: The reason for the refund (e.g., ‘Defective Item’, ‘Changed Mind’, ‘Order Error’).
Tracking the refund event helps you:
- Understand refund patterns: Analyzing the reasons for refunds helps identify trends that could indicate issues with product quality, customer service, or order fulfillment.
- Improve product quality and services: By knowing which products are refunded most often and why, you can work to improve quality control or provide better product descriptions to reduce dissatisfaction.
- Financial insights: Refunds directly impact revenue, so tracking them allows you to better manage your e-commerce store’s financial health.
By capturing refund events in your Data Layer, you’re building a comprehensive view of customer satisfaction and operational performance, which can lead to smarter decisions and improved retention strategies.
✨ Other Events & System Tracking
Before signing out, Priya shares a product with a friend, setting off another potential shopping journey. Meanwhile, any system errors she encounters are noted to improve her experience. Finally, as her session ends, her digital footprints fade—until the next time she returns.
🔄 Sharing a Product – Recommending something to a friend.
🔄 Encountering an Error – Something went wrong, but it’s noted.
🔄 Logging Out – Signing off for now.
🔄 Ending the Session – Until next time, Priya!
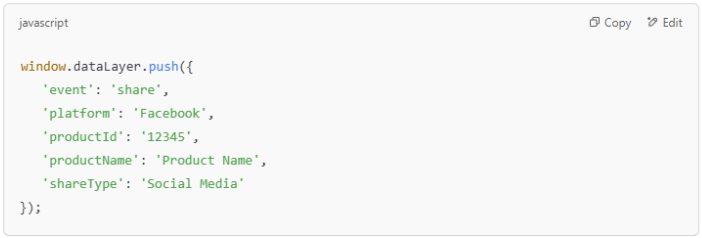
26. Tracking “Share” Events with Data Layer
So, Priya spots a product she absolutely loves on your site. She’s so impressed that she decides to share it with her friends on social media. This is where the magic of tracking comes in!
By capturing the “Share” event through the Data Layer, you can get insights into how often and where users are sharing your products. It’s a great way to see how your products are performing socially and to measure the effectiveness of your social media strategy.
Understanding these share actions helps you fine-tune your content and engagement, making sure you’re connecting with your audience in all the right ways. Ready to track those shares and boost your social game? 🚀
Example:
🔍 What Happens Here?
>>> Priya shares the product → Data Layer triggers the ‘share’ event
>>> Logs share details (platform, product ID, product name, and share type)
>>> Tracking tools capture the sharing action, giving you insights into how your products are being shared across platforms
Tracking share events is a game changer! It helps you measure the success of your social media campaigns, track customer engagement, and see which products really resonate with your audience. By knowing where and what users are sharing, you can fine-tune your marketing efforts and encourage even more social sharing.
Want to boost brand awareness and make the most of your customers’ social engagement? 🚀
27. Tracking Error Events with Data Layer (Focusing on System Errors)
Now, let’s say Priya runs into a snag while trying to complete her purchase. Maybe the link breaks, there’s a payment glitch, or a system error stops her from finishing her order. Frustrating, right? This is exactly why tracking error events is essential.
Example:
![]()
🔍 What Happens Here?
>>> Priya encounters an error → Data Layer triggers ‘error_tracking’ event
>>> Logs error details (error code, error type, message, and page location)
>>> Tracking tools capture the error and send this valuable data for further investigation
Tracking system errors helps you identify and fix issues quickly while understanding the impact of errors on user experience. By monitoring error events, you can improve site reliability, troubleshoot effectively, and enhance overall user satisfaction.
28. Tracking Log Out Event Data Layer
When users decide to log out of your site, it’s important to track the event. This gives you valuable insights into user behavior and helps ensure your site is performing at its best. By tracking log-out events, you can understand session activity, monitor how often users log out, and even spot trends related to engagement and security.
For instance, Priya might log out after browsing your site. Capturing this action allows you to analyze when and why users leave, helping you optimize the user experience and strengthen security measures.
Example:
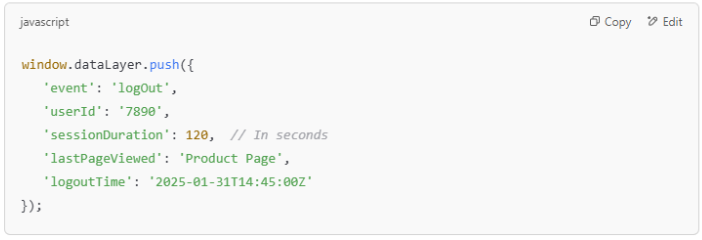
🔍 What Happens Here?
>>> Log Out Event: When Priya logs out, this event is fired.
>>> Event details:
- User ID: The unique identifier for the user who logged out (e.g., ‘7890’).
- Session Duration: The total time the user spent on the site during this session (e.g., ‘120’ seconds or 2 minutes).
- Last Page Viewed: The last page the user visited before logging out (e.g., ‘Product Page’).
- Log Out Time: The exact timestamp of when the user logged out (e.g., ‘2025-01-31T14:45:00Z’).
Tracking the log out event is important because it provides insights into:
- User engagement: Understanding how long users are staying on your site and what pages they visit before logging out can help improve your site’s content and design to encourage longer visits.
- Session monitoring: Tracking user sessions and logouts ensures you’re aware of when users exit, which can help identify any potential issues (e.g., sudden logouts due to site errors).
- Security: Monitoring logouts can be crucial for security purposes. If there’s an unusual number of logouts, it might indicate a problem that needs attention.
By adding the log out event to your Data Layer, you’re gaining valuable insights into user sessions, helping you fine-tune the overall user experience, and better understanding how visitors engage with your site.
29. Tracking Session_End Data Layer
Tracking the Session_End event is key to understanding the full user journey on your website. This event is triggered when a user’s session wraps up—whether they log out, leave the site, or just step away after a period of inactivity. Capturing this helps you see how users engage with your site, how long they stay, and what they do before they leave.
For example, when Priya finishes browsing and exits the site, you can track when her session ends. This data helps you analyze session lengths and identify patterns in user behavior, giving you deeper insights into how visitors are interacting with your site.
Example:
🔍 What Happens Here?
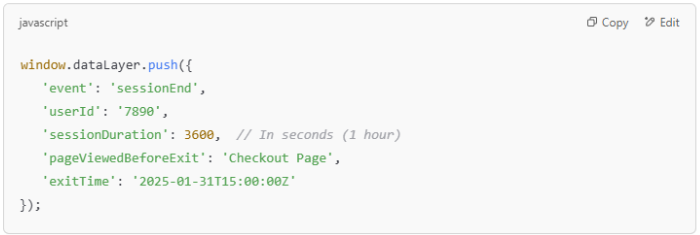
Session End Event: The event is triggered when the user’s session ends (e.g., Priya finishing her browsing and leaving the site).
Event details:
- User ID: The unique ID assigned to the user (e.g., ‘7890’).
- Session Duration: How long the user’s session lasted (e.g., ‘3600’ seconds or 1 hour).
- Page Viewed Before Exit: The last page the user was on before exiting the site (e.g., ‘Checkout Page’).
- Exit Time: The exact timestamp when the user session ended (e.g., ‘2025-01-31T15:00:00Z’).
Tracking session end events allows you to:
- Analyze user retention: Knowing when users leave your site helps you spot trends and patterns in user behavior (e.g., do people leave after a specific time or action?).
- Monitor session durations: Understanding how long users are staying on your site helps you optimize content and engagement strategies.
- Identify issues: If users tend to exit after certain pages or actions, it might signal a problem with your website, such as a confusing checkout process or slow loading times.
- Improve site performance: With session data, you can better tailor user experiences and enhance engagement strategies to keep visitors around longer.
By implementing the session end event in your Data Layer, you can monitor user behavior more effectively, optimize the flow of your website, and work on enhancing the overall user experience.
Improve Your Tracking Setup!
🚀 Why the Data Layer is a Game-Changer
Using the Data Layer means you’re not just guessing what works on your website—you have hard data to back up every decision. From tracking a shopper’s first visit to their final purchase, every interaction is logged, helping you optimize marketing, improve user experience, and boost conversions.
Ready to make your website work smarter? Let’s harness the power of the Data Layer together!